Splash tribute Sea Harrier
Project start 2022-05-01
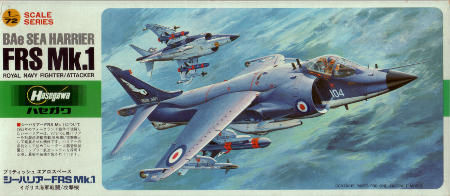
I was completely determined not to get dragged into any new builds until I'd completed a good part of the bench queens, but when Alan "Splash" Ashdown, one of the nicest people on the forum, died, and the decicion was made to have this GB double as a tribute to him since he quite literally served with distinction in the Falklands campaign, I felt it was the least I could do to take part. This meant I was totally unprepared for this GB, and had to make do with whatever the stash would supply, which left me with only a Hasegawa Sea Harrier.
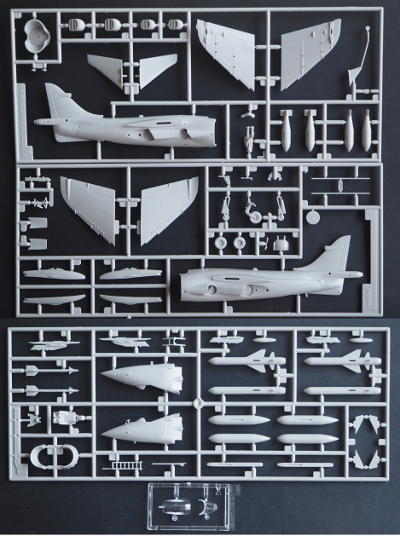
The kit is the 1978 tooling, which Hasegawa used as the base for their FRS1 and GR1 offerings. That makes it new enough to be considered a "modern" kit, with a decent level of detail and modern features like recessed panel lines, but at the same time still old enough to be fairly basic when it comes to interior parts. Frankly, I like that era; good enough to build a very decent model, but not yet the somewhat over engineered kits that followed, which had you pay for loads of detail not everyone cared about, but which those who do care typically throw out in favour of after market resin or etch.
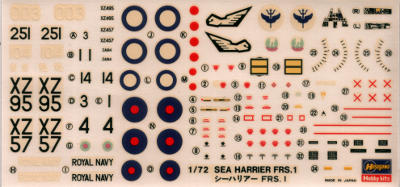
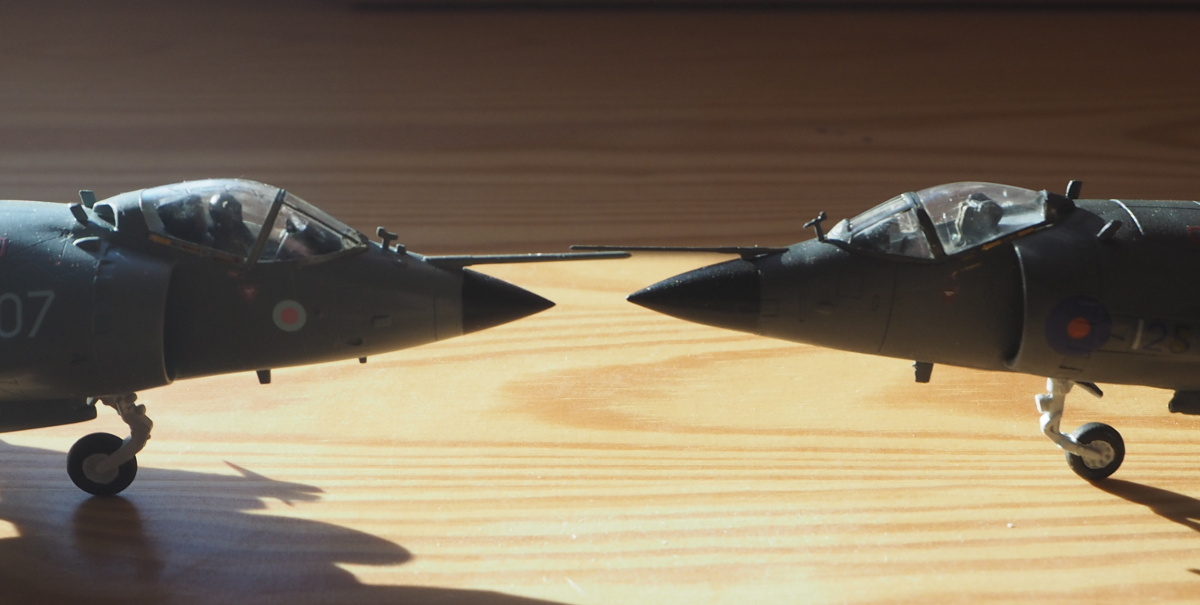
Not entirely surprisingly the kit comes with markings for two machines that were involved in the Falklands crisis, alhough only one of those would have been present at the time when actual hostilities were taking place. So, again I have a choice of one, a Sea Harrier from 899NAS based on HMS Hermes. Payload will consist of fuel tanks, Sidewinders and gun pods, all of which are provided by the kit.
2022-05-01
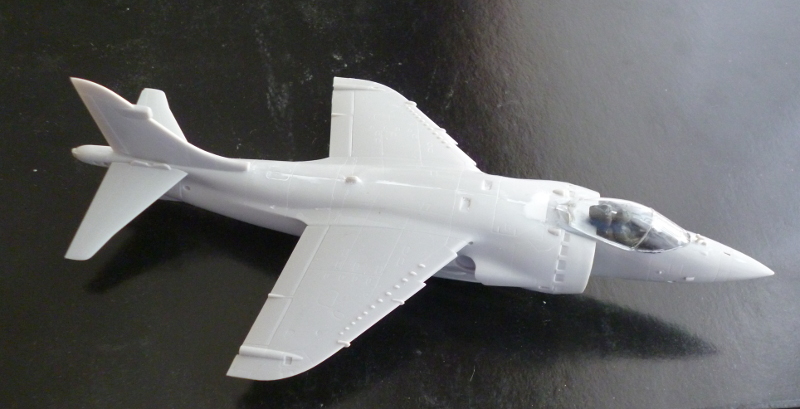
The cockpit module is a single piece representing both the tub and the ejection seat. I have a
much nicer resin ejection seat lying around, but to fit it would involve loss of the cockpit tub
and a complete scratchbuild of the interior, which risks a DNF. The pilot figure isn't all that
great either, but should be sufficient to create a busy interior and hide the lack of seat detail.
As expected, instruments are provided as decals.
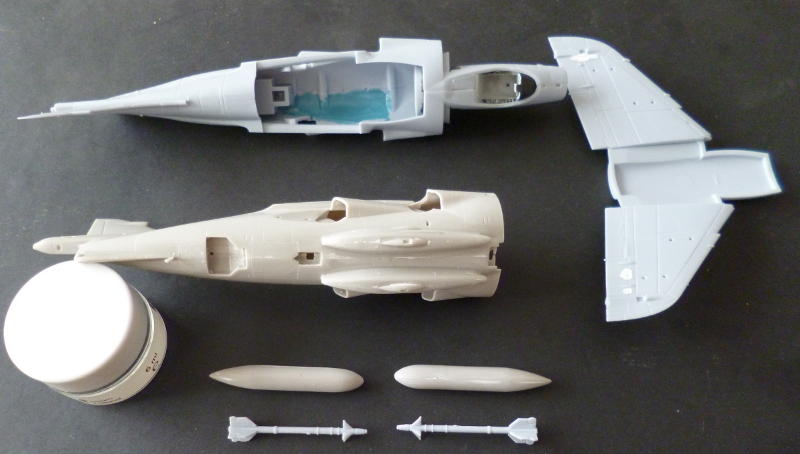
The main fuselage and the gun pod halves are joined. Fit is pretty good, but that won't prevent
some work along the spine, and probably some panel line restoration, since the (otherwise lovely)
very fine lines will probably be wiped out by the slightest sanding.
I've made a start at filling in the trenches of the Sidewinder locator tabs; they make it easy
to get the missiles on correctly, but it never looks good to me, so I prefer filling them and
lining up the missiles by hand.
2022-05-07
Just some small steps today. I've done some painting on the cockpit tub, and got the decals on.
The decals are about twice as wide as the consoles in the plastic, so some trimming will have to
be done after they've set and been treated with solvent. I failed to notice earlier that the
back of the ejection seat is very visibly hollow, so I've started work on blocking that off.
I've mostly cleaned up the Sidewinders, but they'll need another pass. A small amount of filler
along the spine of the fuselage is curing, and I got some painting done on the engine front and
exhausts.
2022-05-16
I've completed the cockpit, such as it is, and closed up the forward fuselage. For once, I seem
to be building an aircraft that will be somewhat controlable, since I didn't lose, forget, or
otherwise ommit the control stick. On the down side, I had to choose between cutting off the
pilot's legs, or cutting off most of the instrument panel; I decided he'd probably like the legs
more than the instruments.
I had a bit of trouble with the canopy. I'd dipped it in Clear earlier, but that didn't work out.
Apparently, it wasn't quite as clean as it should have been, and the coat was an uneven mess.
Soaked it in IPA overnight, then washed it with detergent. At that point, it wasn't just clean,
but also very visibly scuffed (most likely not my recent doing), so some work with very fine
sandpaper was needed. I find that Tamiya gloss varnish is slightly better at hiding minor blemishes
than Clear; if it's nice and shiny when dry, use Clear, if it's matted when dry, but clear and
shiny when wet, switch to varnish.
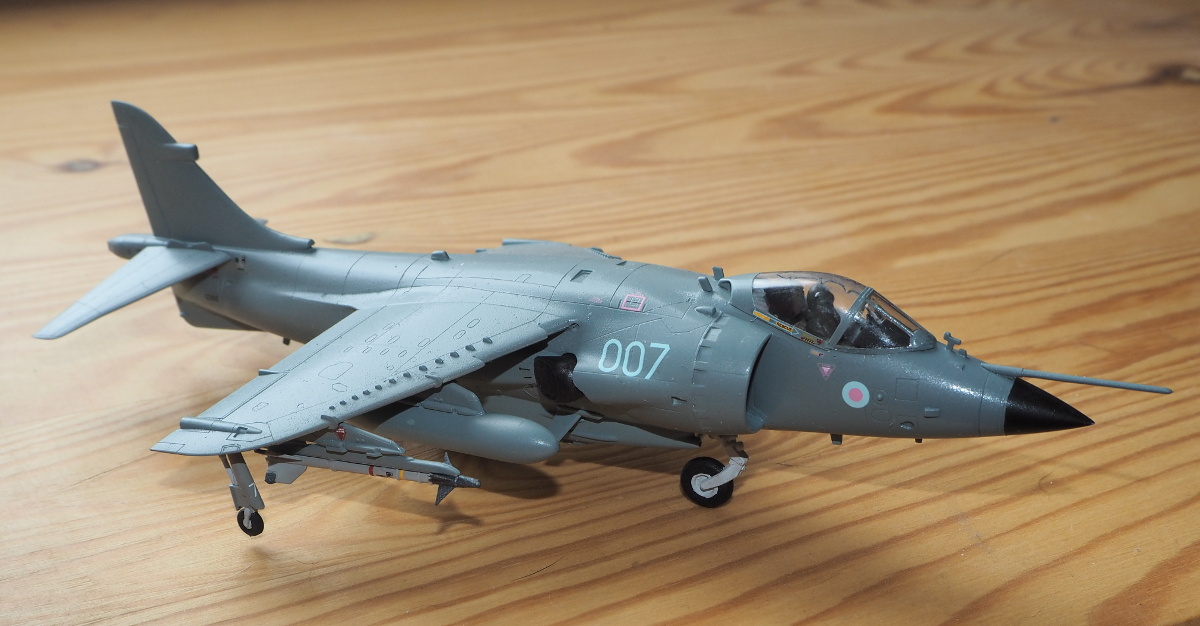
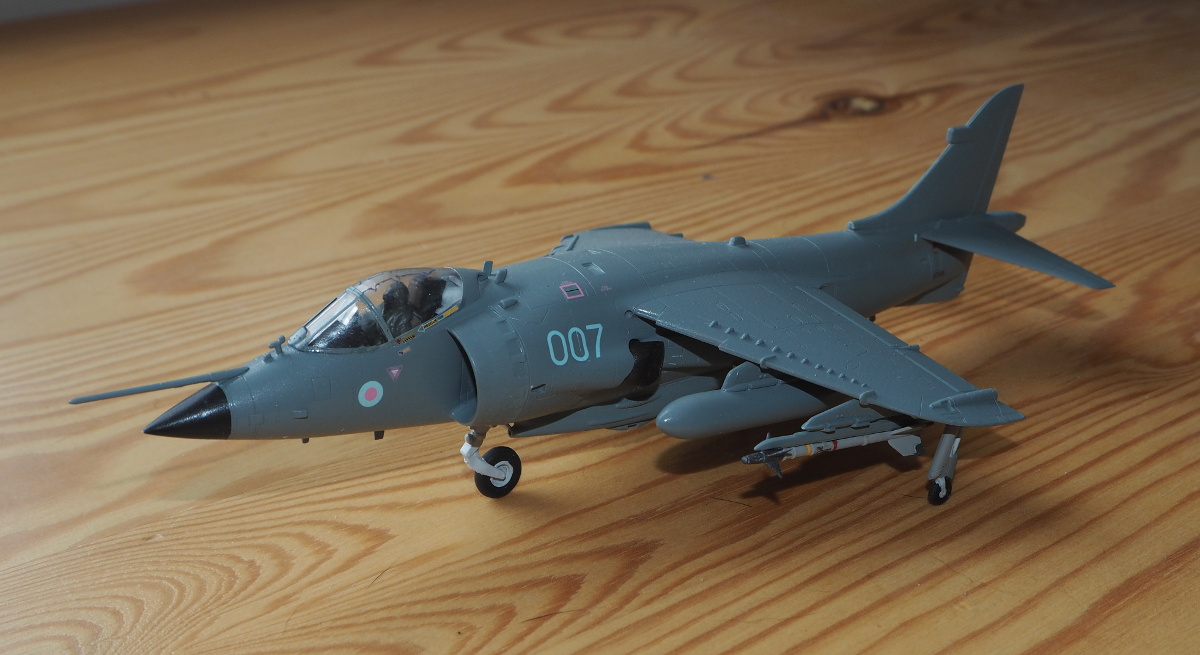
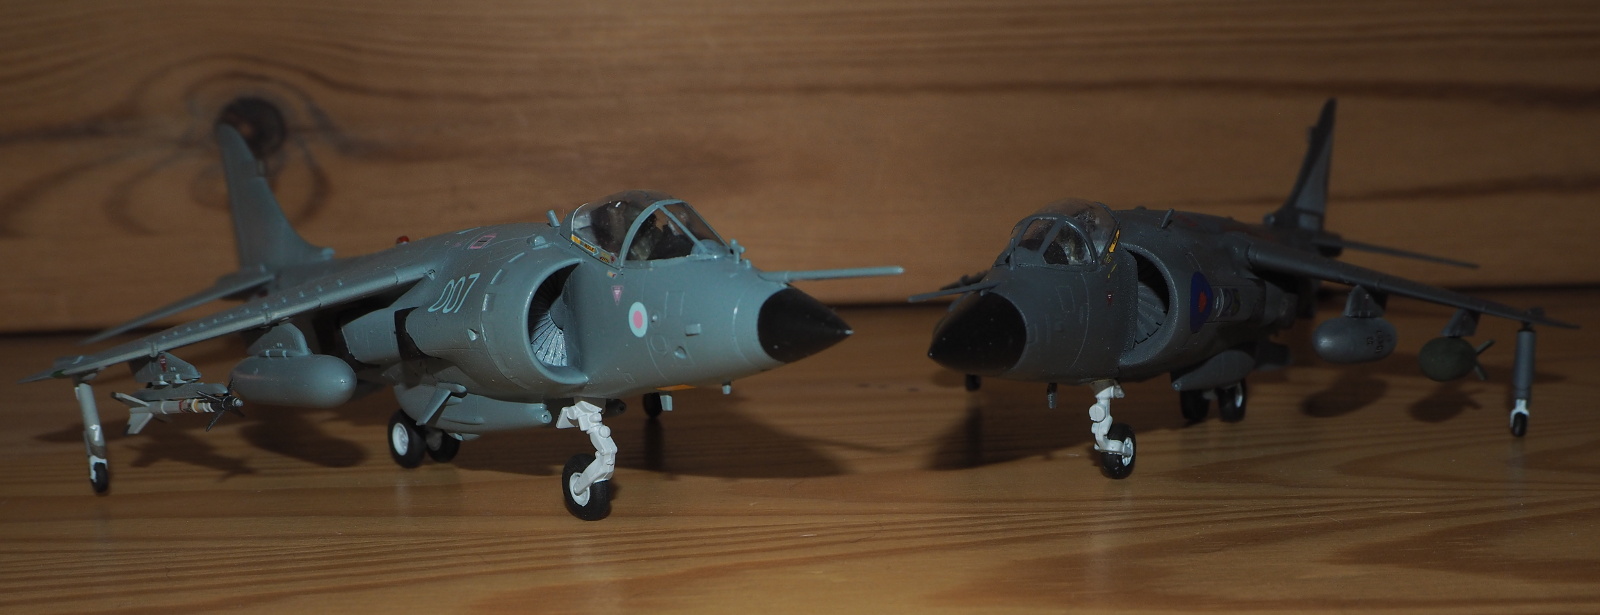
An Airfix Shar crossed my path last week, and I couldn't resist pouncing on it. This causes some changes of plan.
This Harrier will be re-assigned to HMS Invincible, and change it's colours to Medium Sea Grey
and Barley Grey, courtesy of the Airfix decals. I'll also swap out the Sidewinders for a pair from the Airfix kit.
2022-05-21
I spent quite a bit of time on the Harrier, with little to show for it. A lot of minor, but time
consuming cleanup and filling/sanding going on. This includes the main fuselage, which also
needed a bit of re-scribing of lost panels, and all of the weapons load.
The Airfix Sidewinders look great, but the rear fins are to thick for the lots they're supposed
to fall into, which lead to some finnicky filing and fitting.
The gun pods, as with all Harriers I've ever seen, were hard to align, with in this case no
alignment pins and instructions that roughly translate to "stick on about there-ish". I ended
up dry fitting the Airfix pods, which do have minimal alignment pins, noting the position
relative to the panel lines, and then lining up the Hasegawa's with the corresponding panel
lines. Filling and sanding the inevitable gaps between the fuselage and the pods would have
been problematic, especially between the pods, so I was relieved when the gap filling properties
of thin cement preved sufficient; if the gap is narrow enough, flooding the area with cement
will cause the plastic to disolve and flow into the gap, in effect using locally created sprue
soup as filler. Usually, you get a slight dip where the gap used to be, looking suspiciously
like an engraved panel line.
2022-05-23
The canopy had the MDC explosive cord engraved in, but unfortunately it is raised, rather
than engraved. A simple wash to bring it out doesn't work here. I tried drybrushing it,
but removing the inevitable scuffmarks alongside the MDC also wrecked the layer of varnish,
despite the varnish being well cured acrylic, and white spirits being used to wipe unwanted
paint. Apparently acryic resin isn't as immune as I'd thought. I ended up wiping the lot,
effectively resetting the canopy. After the reset, I tried again with pastel crayon. This
made less of a mess, but still required a bit of corrective wiping with water. Turns out
the inside of the canopy had a small, very slightly rough spot, and an small amount of
crayon won't budge from it. This will not be the clearest canopy ever..
Hasegawa have managed to lose the rear bulkhead of the canopy; the rear end is simply open.
Like anyone who plays with paints and glues, I fully appreciate the value of proper
ventilation, but this is daft. High speed air combat over the South Atlantic in an
open cockpit airplane is just plain out of the question.
One could argue, probably with justification, that this will never be seen, and is
therefore irrelevant, however, the moment airbrushes or rattlecans enter the picture,
things change. I can pretty much guarantee leaving this as is will deliver a catastophic
amount of medium to dark grey overspray into the cockpit, especially the inside of the canopy.
I've fitted a thin strip of Evergreen inside the canopy frame at the end of the spur, and
filled in the gaps between strip, spur, and frame with Clearfix.
2022-05-29
Construction is mostly complete, and the Harrier has made it's way to the paintshop,
where it will pick up some colour over the next few days. I gambled and skipped the
single colour overall step after a light coat of primer, and went straight to the
first colour, Barley Grey. Predictably, some minor issues became visible, not the
results of the fitting and sanding, but some nigh invisible gaps between the wing
halves. Easy enough to fix, although more grey will need to follow afterwards.
2022-06-05
It looks like I may have hit a snag. Three day ago, I put the Medium sea Grey on, and
the paint is still tacky. It looks perfectly nice, but there's no telling when I'll be
able to continue.
2022-06-08
The paint has finally dried. I've started fitting the remaining parts, along with
decals and spot painting. Since the paint is currently a very high gloss, meaning
some duller varnish will certainly be needed, I've left the masking on the canopy
for now. I'd already decided to do some of the canopy frames with painted decal
paper, so the very last stage of the build will be unmasking the canopy and creating
the frames, hopefully without getting a jarring difference in glossiness or even colour.
2022-06-10
All that remains is a top coat of varnish, and the decals that overlap the cockpit frames,
along with the decals that will make up the cockpit frames.
I've only now spotted a rather ugly blunder on my part: the starboard tail plane angles
downward a lot more than the port one. If I'd caught this earlier, I might have been
able to fix it, but I'm afraid at this stage, this Harrier is doomed to lopsidedness.
2022-06-14
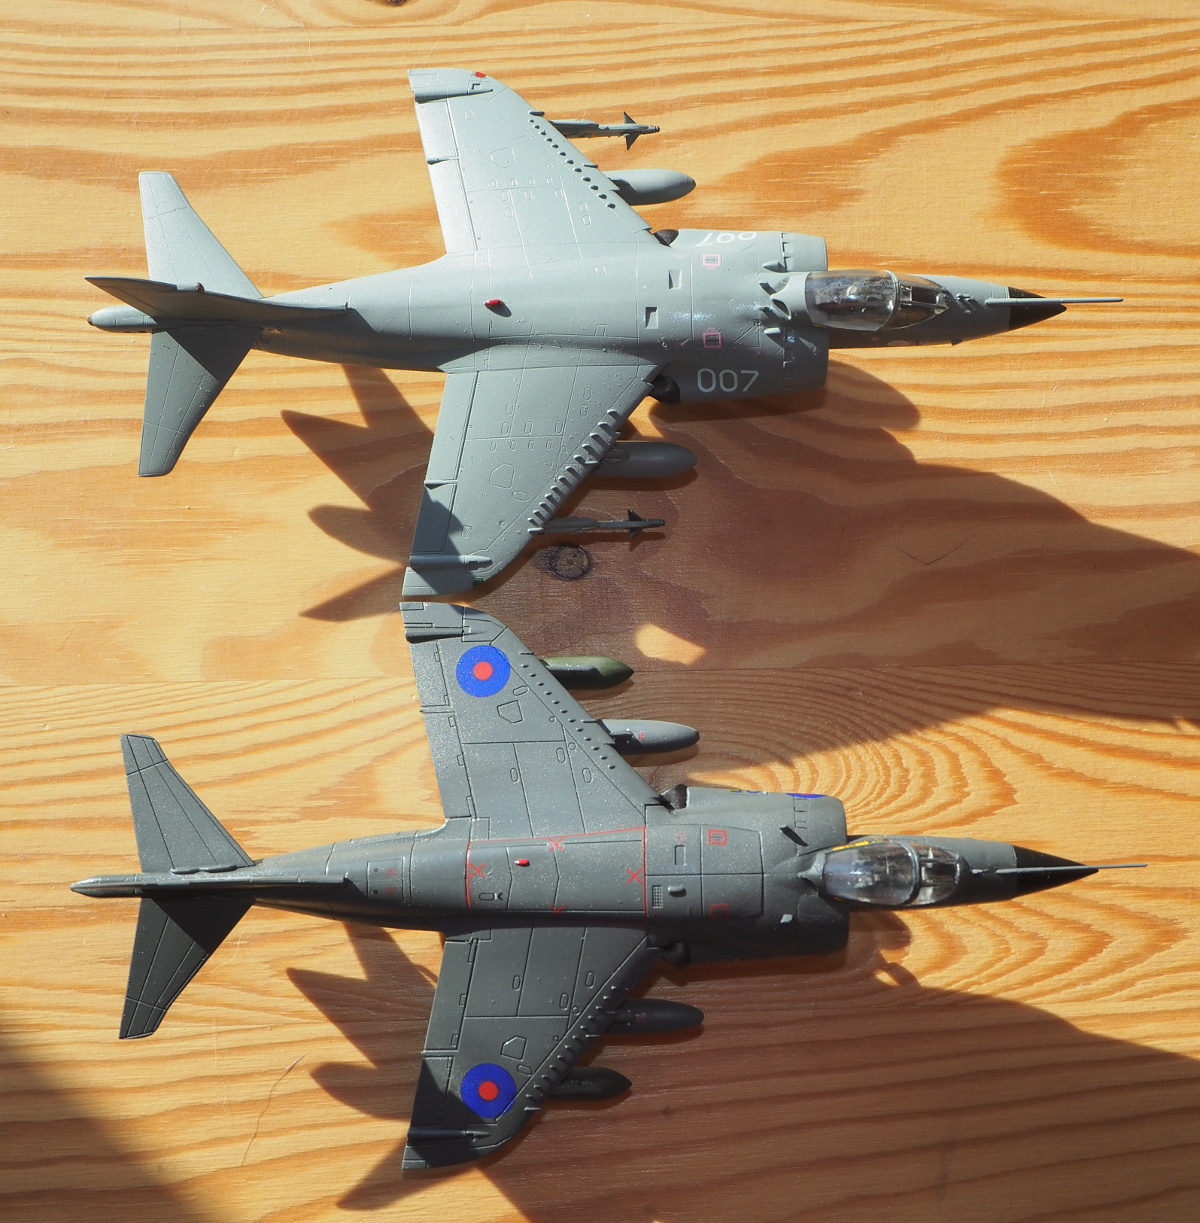
All done..
|
|
Together with the Airfix kit mentioned earlier, that was built in parallel.
|
|
|
|