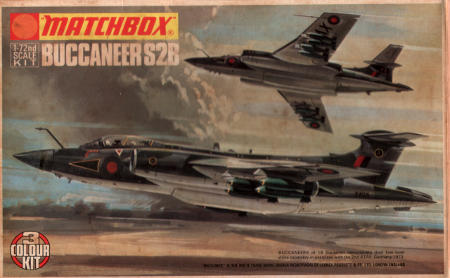
Matchbox Buccaneer
Project start 2017-02-01
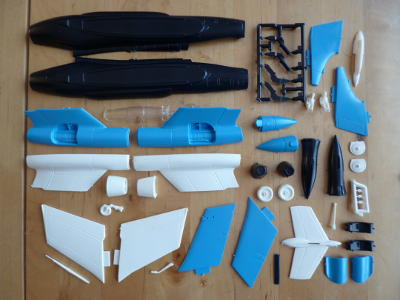
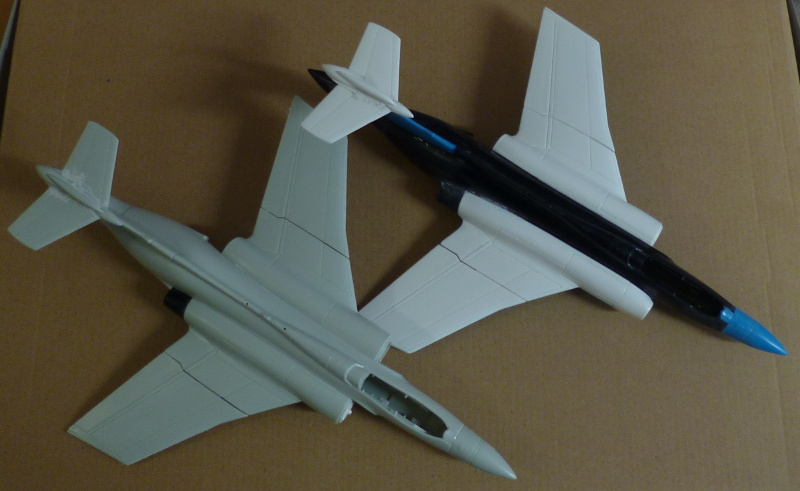
I'm finaly kicking off one of my Pokemon projects. This particular kit had a previous owner who very "helpfully" removed most of the parts from the sprues, so the sprue shot is a little different. The crew were AWOL, but the spares box still had a pair of (by the looks of it) Matchbox jet pilots in white plastic, so I'll consider that an acceptable fudge. A fellow builder was kind enough to supply a second set of decals, so the intended twice in sequence build is now possible complete with markings.
2017-02-01
Since I couldn't sleep after the cat had used my bed, and by implication, me, as a
trampoline just past 5 this morning, I figured I might as well get an early start.
Cleaned up the main parts to the point where they could be joined (I tend to leave
the bits sticking out of the composite part on to avoid over-sanding), and reduced
a bunch of two part parts to single parts.
Fit is quite nice actually, with only the upper and lower wing parts leaving a gap
that will need working. I'll be fudging this with white filler, as I don't have
white sprue to work with. I did find a bunch of sinkholes that will need work.
Fortunately, most of these are on the dark blue fuselage halves, and I do have some
sprue in that colour, which is now soaking in solvent to become sprue soup/filler to
deal with them. The seats needed a lot of cleaning up, but nothing problematic.
2017-02-01
I just put blobs of disolved sprue into the sinkholes. Now, we wait...
The wings have been sanded smooth; the white filler seems to blend in nicely
with the white plastic. Other than a lump of lead in the nose, that's it for today.
2017-02-03
Oh boy, have I hit a snag..
It turns out that my apparently complete kit has two right engine exhausts, and
zero left ones. They look very similar at first glance, but they really are
completely different shapes. No idea how I'm going to weasel my way out of
this one, let alone within the GB timeframe.
2017-02-03
Missing pieces not withstanding, work has progressed:
The engine to fuselage joins may or may not be clean, but due to the deep dark
blue next to any shadows, they sure look good. Not so much the nose and tail
cones; these are awful, and have been given a dose of sprue soup, which will
take a few days to set. This won't prevent me from doing further work from Sunday;
the sprue might not be fully cured by then, but neither will it be vulnerable
and/or messy. The connection between the engine exhaust and the main engine pod
is not clean, and will take considerable sanding, but, crucially, I don't think
filler will be needed. That means no long curing times, and thus no reason why
the newly ordered part should be impossible to fit in relatively little time.
2017-02-08
I had entertained some hope that the new Buc would arrive today, the beginning
of the indicated expected delivery interval. No such luck, I just got a notification
that it had shipped, which means it's only started on it's journey. This is just
not acceptable; I need those parts.
So, I popped over to the LHS, and bagged me a Revell boxing of the same kit. This
still won't supply me with the parts I need, since these are all the wrong colour,
but it does enable me to start the mould making process, meaning that when the
Matchbox boxing finally arrives, I'll be able to fit the parts right away, rather
than keeping them as masters for several days.
Since I'm not under any self imposed restrictions with the Revell kit, initial
construction was at near-blitz speed:
Wings and stabilisers are dry fitted on both planes.
Please note that the Revell kit has received the excess right side parts from the
Matchbox kit, and now has three different colours of plastic in it, making it a proper Matchbox kit.
2017-02-10
My new three-colour Buccaneer just arrived.
Sadly, it is fairly useless to this project. Matchbox changed the three
colours at some point, and this one is different from my original kit, so
stealing parts is off the agenda. It's also missing it's canopy. I'm basically
back to square one here, with the only advantage being that I now have enough
parts for one complete three-colour Buc. Sadly, neither of the two started ones
is that model. I've 'lost' too much time to start a three colour project from scratch,
so the new kit goes back into the old box, along with one of the canopies, and back into the stash.
The running build loses it's status for my catalog project, and becomes at best a test
subject. No idea what I'll do to make up for the canopy shortage yet; maybe I'll take
transparent resin for a spin..
This build may wel end up going from a single three-colour build, to a two ship build,
to a three ship, only to fall back to a single kit normal build in the end.
2017-02-10
The moulds for the non-transparencies have yielded their first results. The
engine face and exhaust are good to go. The intake was only half full; this
does not indicate a problem with the mould, since this is a mould simply filled
from the top, after which a plug is inserted into the puddle of resin, rather,
it means I misjudged the amount of resin needed. A second casting is now curing,
and since this attempt has resin oozing out the top, I'm fairly confident it will
be completely full, and will yield a good intake. If so, that's, sadly, also the
end of the line for the moulds, unless someone here pipes up before the end of the
GB and tells me there is a requirement for more of these parts. No point in keeping
moulds around for parts I'll never need again..
A lot of sanding has gone into the Revell model (and the Strikemasters and a bit in
the Tornado), to the point where I had to stop because the water used (wet sanding
all the way) had soaked my fingertips into wrinkles and weakened my nails (very
useful for squeezing sandpaper into tight corners, but not so much when softened).
Even then, there's some more sanding waiting there..
2017-02-11
The second Buccaneer is back in business. I mailed the seller, and to my surprise,
he actually found the missing canopy, and will send it soon. Customer service is
still alive and well in some places.
2017-02-12
Sanded off the gaps between tail and fuselage of the tri-colour model, then
stuck the wings on. I was unable to fettle the gap between the inner and outer
wing panels away far enough for my liking. No problem on the upper surfaces,
as those a white plastic, but on the lower sirfaces, this leaves a gap between
two mid blue parts, and I have nothing to fill the gap that will match the colour.
As this build has lost most of it's bare plastic first status, I fudged it by using
Perfect Plastic Putty with some Vallejo Dark Prussian Blue mixed in. I suspect the
result will be too dark, but it beats a stark white line. We'll see when I've cleaned
up the seam.
The Revell kit has had a load of sanding done, and the resin parts installed. Then,
there was more filler, which is now curing. I hope to get the wings on that one tomorrow as well.
2017-02-14
Coarse construction on the tri-colour is complete.
It's just had a nice hot, soapy bath to get rid of all the sanding dust, and
is now drying. Stage one construction should be complete tomorrow, with a
completed bare plastic Buccaneer not far behind.
Coarse construction on the Revell model is only marginally behind; it should
reach the point where it gets a first shot of primer tomorrow. I really should
get to work on the seats and pilots for this one.
2017-02-15
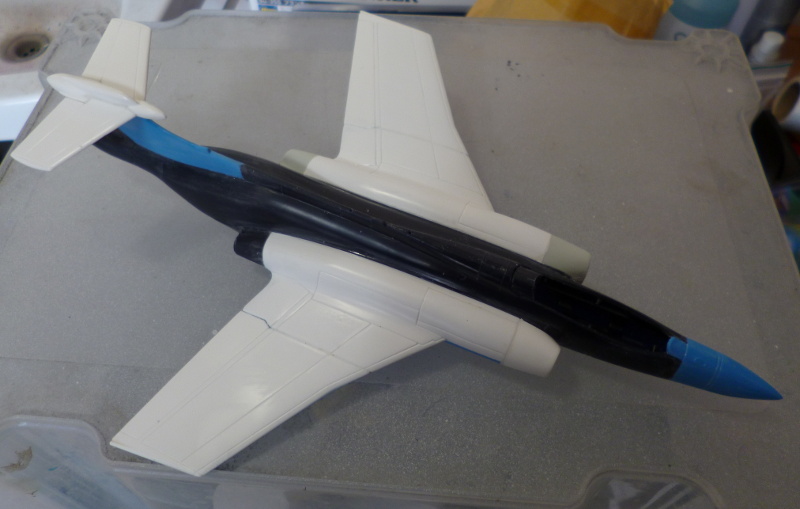
Construction of the tri-colour has been completed. I've also painted it in what is rumoured
to be every girl's favourite colour: Shiny!
2017-02-18
The bare plastic stage of the Matchbox boxing is complete.
|
|
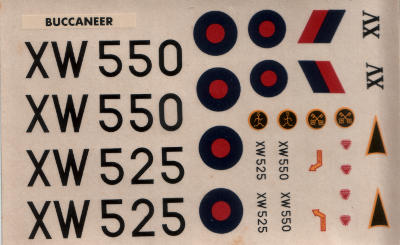
The decals were a late German production sheet. Let's just say they were not suitable as showcases of superior German engineering...
They disintegrated like mad, and instead of sticking, they curled. Good thing my paranoia saved me, and all but the test subject
were covered in three layers of liquid decal, while most of the adhesion and curling problems were fixed with Humbrol Clear.
The printwork was also noticably out of register; fortunately, this didn't go so far as to have the carrier film and colours in
different spots (don't laugh, I've had that happen), but it was close. On the bright side, the white rims make it easier to spot
the roundels against their dark blue background.. The black serial numbers that should have gone below the tail were left out;
they would have been invisible anyway.
Once painted up, the model will receive older, but most likely better, original Matchbox decals.
2017-02-21
The canopy for the second Buccaneer arrived today. The good news is that it is indeed a 1/72 scale Buccaneer canopy.
The bad news is that it's the Airfix part, which is several mm wider than the Matchbox one, and thus completely useless..
Where's my rubber and resin stuff...
2017-02-21
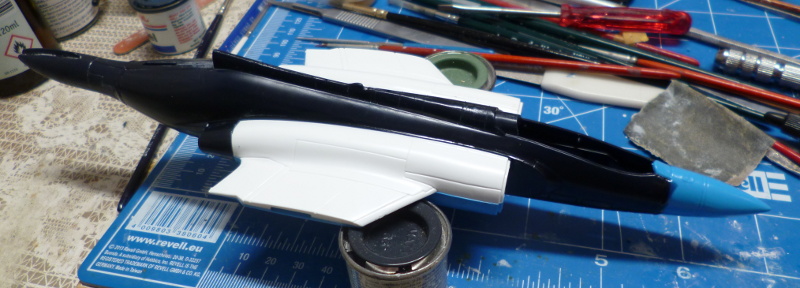
The formerly bare plastic model was hit with primer yesterday, and for once, the resulting
disaster was according to plan. I'd long suspected that the primer I use is simply unable
to coexist with existing paintwork, but there was the possibility damage to the existing
paint was part of the problem. This brand new, all over layer of varnish was, I'm certain,
not yet damaged in any way, and yet, the primer totally wrecked it. I'd sort of counted on
that for confirmation, and on this particular model, I could afford it, since rather a lot
of sanding was certain to be needed anyway; the little extra to get rid of the expected
primer mess was considered acceptable.
Wrinkled up or not, the primer did it's job in showing me where further work to the exterior
of the model would be needed. Satisfyingly little, actually. The joins between the engines
and the fuselage needed a bucket of filler (the almost black blue had neatly concealed the
issues there), and bit of work on the tail, but other than that, the build was good to go.
Filler is on and curing. I shudder to think of the mess I'll be making tomorrow sanding all
that paint and filler off again...
The interior of both machines, such as it is, has been painted, and work on the pilots has
begun. They should be ready long before the canopies, although the first half of the mould
is curing as I type this.
2017-02-21
I'd hoped to at least pour the second half of the mould this evening, but the rubber
is taking too long to cure. Odds are that if I try to rush it, I'll ruin the first
half of the mould instead. I'll have to be patient..
2017-02-21
The fumes from that bucket of filler on the Tornado went to my head, and I unboxed the first
half of the mould. I got lucky..
The second half has been poured and is curing. I should be able to start casting tomorrow.
2017-02-22
Test cast with normal grey resin for starters of course, but this at least proves the
mould is good. The first shot with clear resin is now curing. Since this is the first
time I've actually used that particular type of resin, the suspense is rather murderous,
which is made worse by the fact that this stuff is very slow by comparison; de-mould time
specified as 2-4 hours, as opposed to about 15 minutes for the plain stuff. I'm also a bit
concerned about the specified time to full cure: seven days. I don't have seven days.
2017-02-22
Judging by the speed at which the leftover bit is curing, 2-4 hours may actually be an
optimistic schedule. The leftovers are a sort of thick paste now, after an hour and a half.
De-mould after 2 hours is out of the question. Some time after dinner seems more likely..
On the bright side, at least it is curing. I'm sorry to say that hasn't always been the case
with my little experiments...
2017-02-22
Casting up all those bits has become an excercise in irrational behaviour. I've by now
spent the price of a Revell repop in rubber alone. Any halfway sensible person would have
snatched the parts from the Revell kit and stuffed the remains in the spares box, but
writing off an otherwise workable kit on account of a few missing parts just bugs me.
I just consider myself fortunate that I can afford these little inefficiencies..
2017-02-22
The resin has passed the four hour mark, and it is now a very flexible solid, a bit
like normal resin after about ten to fifteen minutes. I could get it out of the mould
at this point, but that would be certain to deform the cast. Later. Much, much later..
2017-02-22
OK, so that didn't work. I just opened up the mould, and the resin inside was still
just so much gunk. Tomorrow will see another attempt, in the oven at low heat; see
if that gets the chemistry moving..
2017-02-23
Scrap that, the oven isn't cooperating; it can do cold, or too hot, nothing in
between. I'm quite willing to drive this stuff to about 40 degrees, but without
more knowledge of all the chemicals involved, I'm not going above temperatures
that naturally occur. I'd rather not run into some unexpected chemistry and release
poison gas or something (not entirely out of the question, there are cyanide compounds
involved, and if they should break down in inconvenient ways at high temperatures,
things could get messy).
I might, with a week or so of patience, get decent results from this resin, but
that's an experiment that will have to wait. I suspect I'm really driving it beyond
it's specifications though; it's designed for items of 4mm or greater thickness,
and without that bulk, the chemical reactions might not behave as intended (i.e. very
slow, and possibly incomplete - there is such a thing as critical mass before they
start to work properly).
I think I still have some clear epoxy resin hiding somewhere. Maybe I'll dig that
out, and see what can be done with it...
2017-02-23
As near as I can determine, epoxy resin would have characteristics very similar to
the PU resin; not much improvement.
Like all proper techies, I checked the manual only after the initial experiments had
failed (occupational hazard..). Turns out the rubber I used was not the best type to
use with this resin (I used condensation rubber, which may leave a sticky interface
between rubber and resin, rather than the more appropriate addition rubber). There
is a cure for this: baking the rubber at 150 celcius for about two hours; guess what's
happening right now.
Even when so post-cured, the mould still needs to be pre-heated to about 50 degrees,
and it is recommended to cast the resin and after a few minutes put it right back into
a 50 degree environment for a few hours. None of which I did, of course.
Round two coming up..
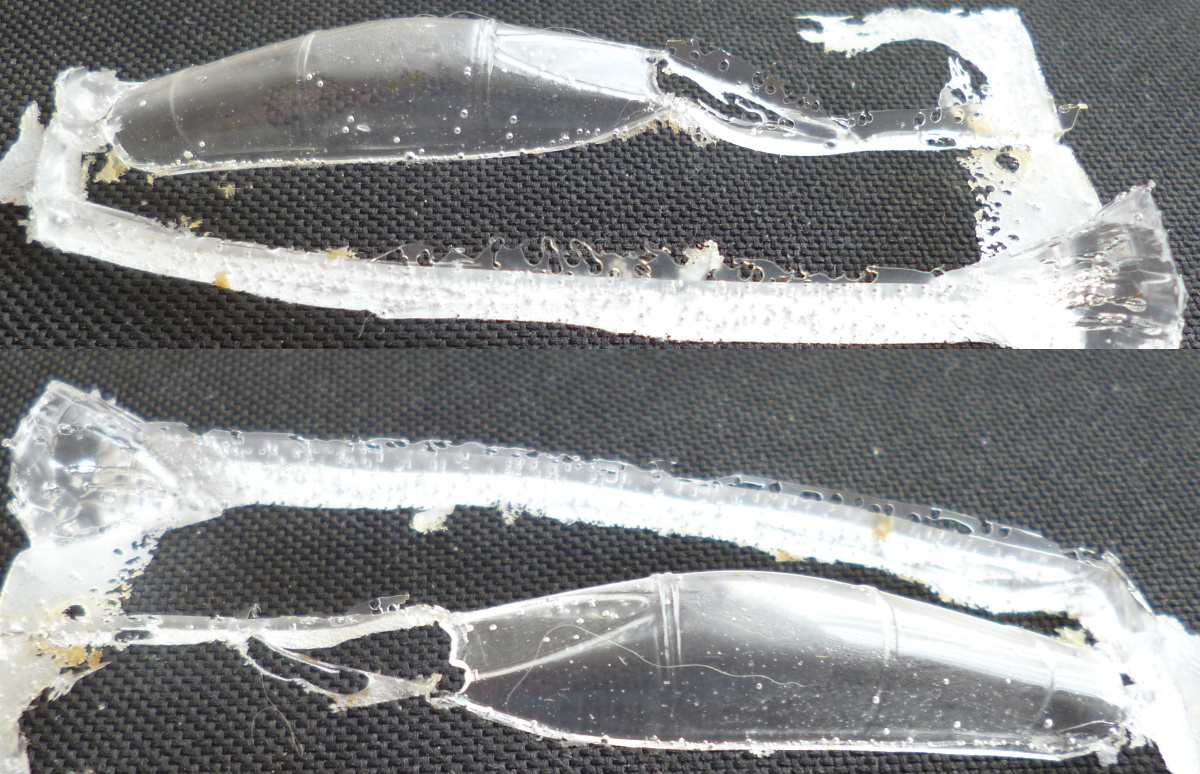
2017-02-24
Seems like that whole RTFM thing paid off. After spending 23 hours in the mould, more
than half of which in a heated or only slowly cooling oven, the resin comes out nice and hard.
Although far from perfect, I think that with a little TLC this canopy will do.
As it is, I see two main issues with it for future work.
First, and trickiest, are the air pockets. I have some hope that by paying a little more
attention to how the resin flows within the mould, I may be able to at least eliminate most
of them. If that doesn't pan out, I'll either have to live with them, or see if I can whip
up a vacuum chamber somehow. I really hope I don't have to resort to the latter; I don't
fancy a rarely used machine cluttering up the place any further.
Second, and hopefully irrelevant, is the somewhat coarse surface on the bottom. I suspect
and hope this is a result of the botched first cast leaving residue in the mould, and the
post curing of the mould, and thus avoidable by doing it right next time.
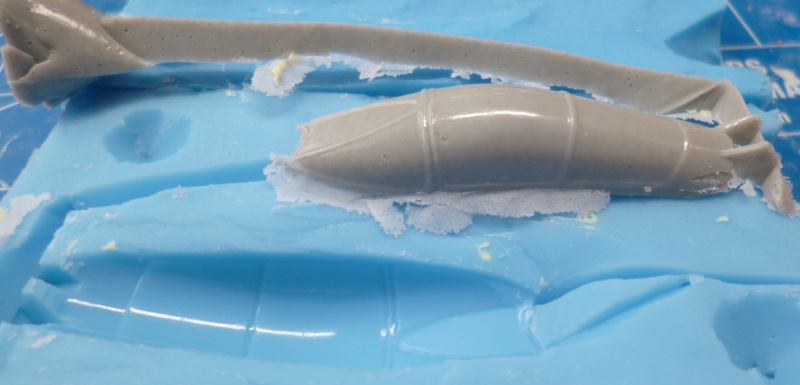
2017-02-24
I've sanded and polished the cast canopy, and dipped it in Clear. If it weren't for the
air bubbles, I'd call it near perfect. The Desert Storm model has a chance again.
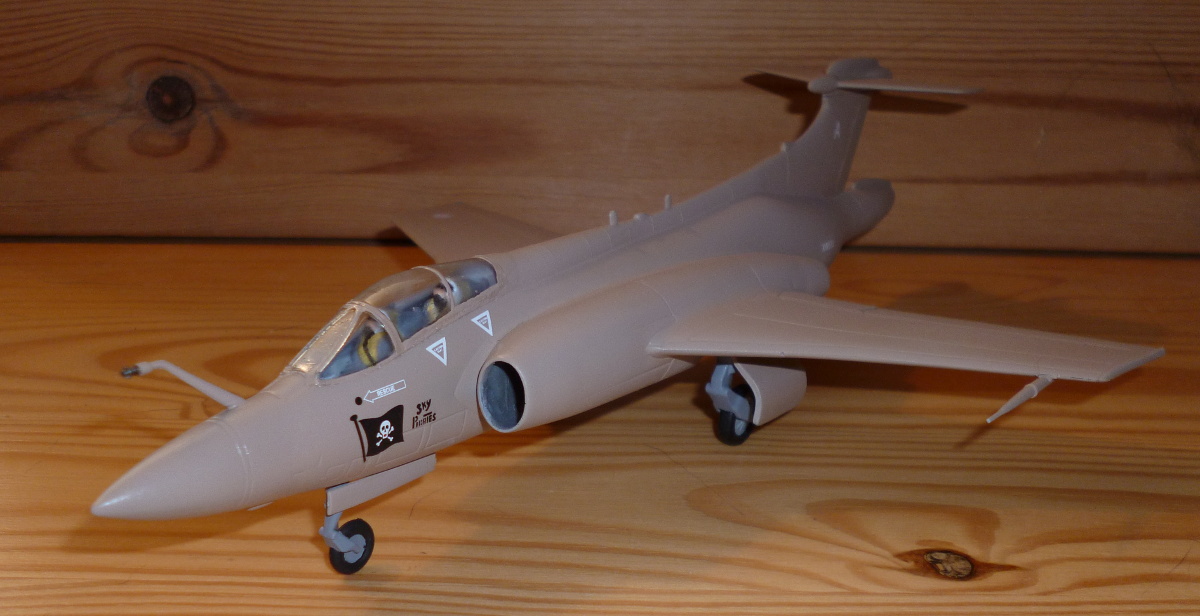
2017-02-27
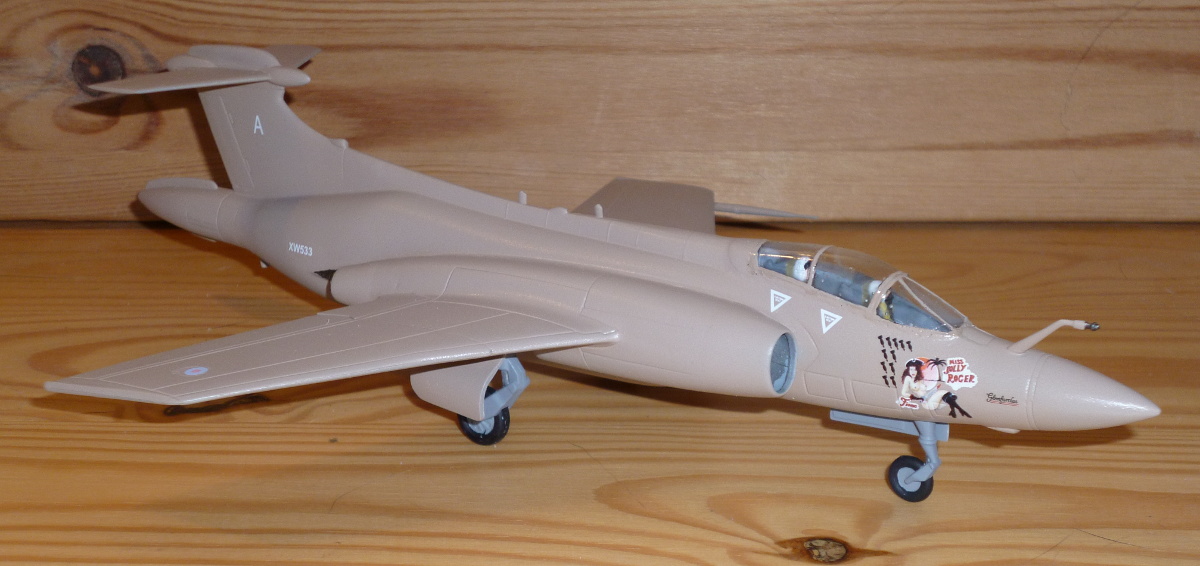
The Revell kit has received it's dazzling paint job: overall beige. Except for the landing
gear doors, which I forgot to take along to the paint shop.. A small oversight that will be
corrected tomorrow when I fire up the airbrush again. Depending on how fast the Xtracolor
paint dries, this one is now very close to completion.
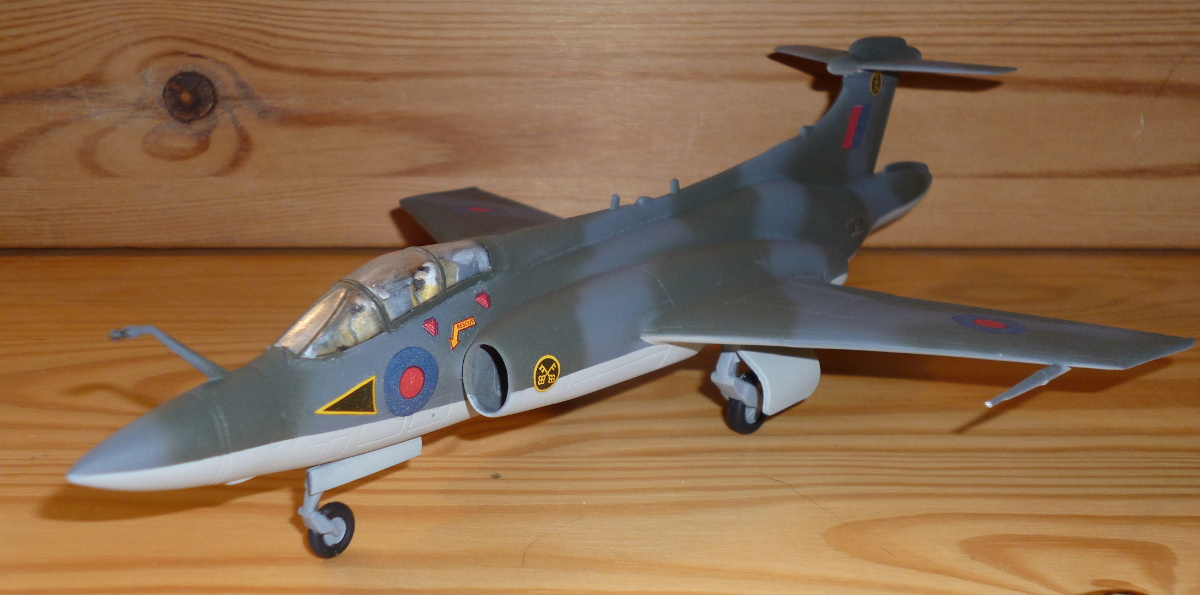
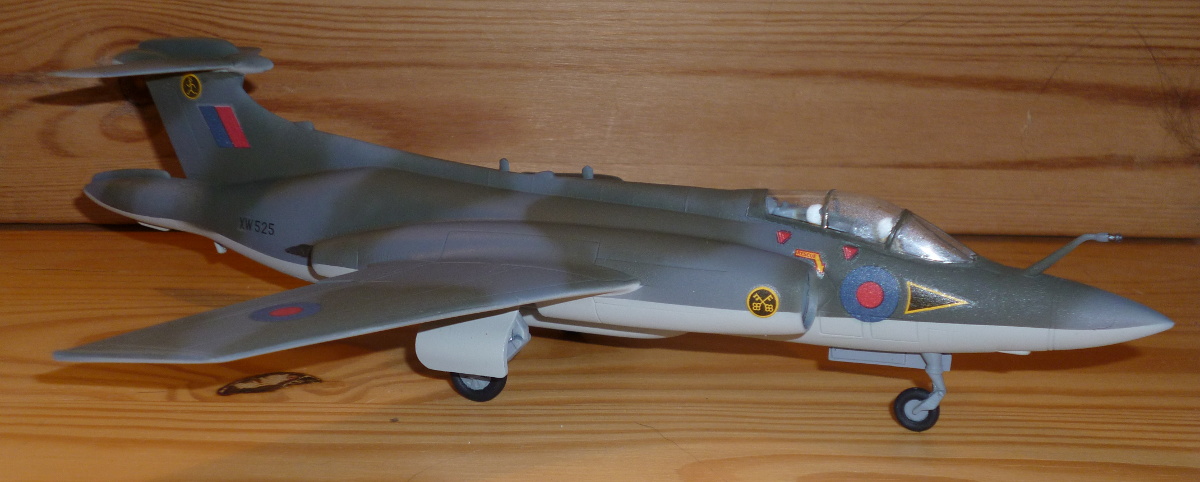
The Matchbox kit, meanwhile, has the lower surfaces covered in grey, with more colours to
follow the next two days, at which point it too will be nearly done.
2017-03-01
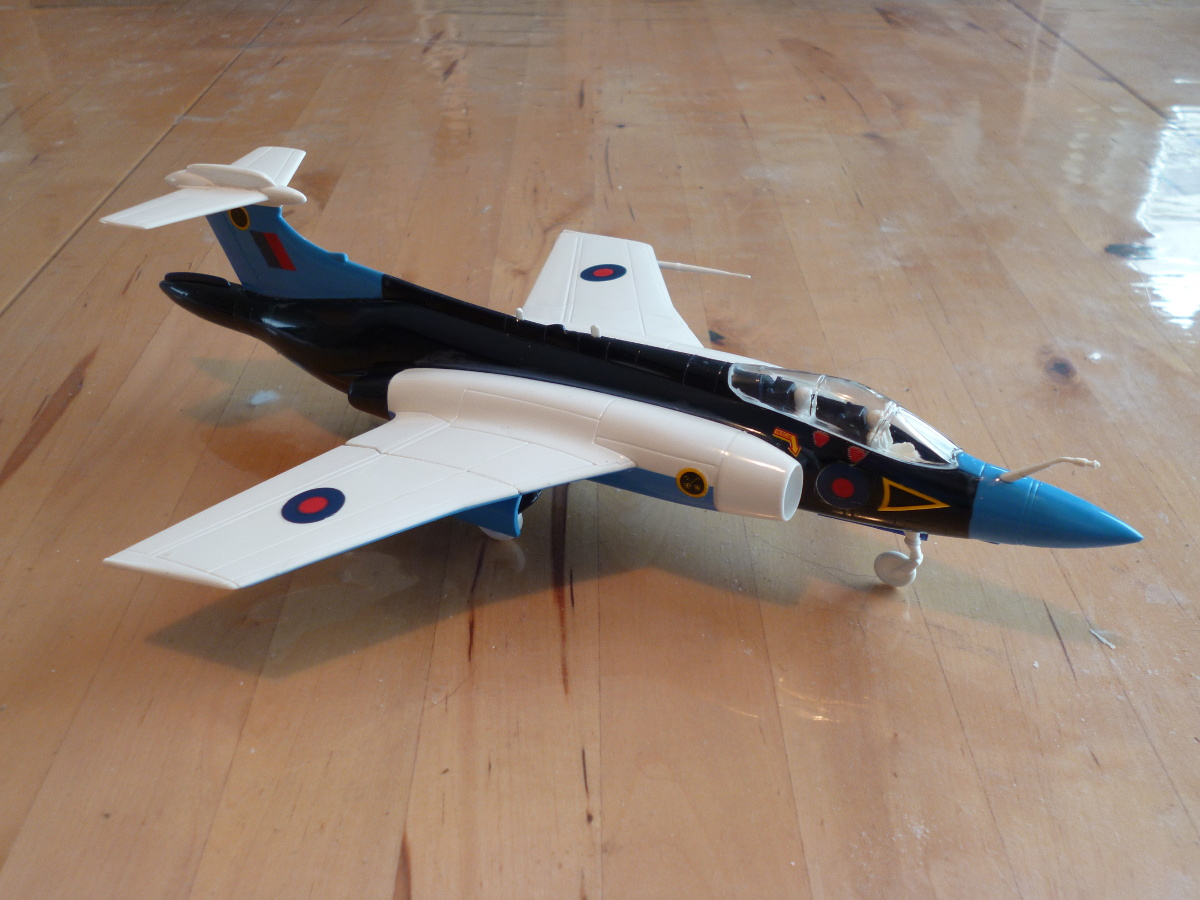
Save for a sealing coat of gloss varnish, the paintwork on the camouflaged model is complete.
I didn't have any clear diagrams for the camouflage, and didn't really feel like spending
hours fiddling with masking tape, so I freehanded it. It might not be accurate, but I like it.
2017-03-03
Both Buccaneers are decalled up, and taking a break for the chemicals to set. I won't be able
to do much more that give them a rub down with luke warm water tomorrow. Sunday should see them
hit with dullcoat, the window frames painted, and the doors installed.
Although the picture hides this, the decals are being problematic. While they handle perfectly,
they dry up all wrinkly. Microsol smooths them out a bit, but these will never come out perfect.
2017-03-03
Really weird, the way these decals are acting. They go on well, then go all wrinkly, almost as
though they'd been hit with strong decal solvent. About 60% of them then straighten out perfectly,
snuggling into the panel lines and such (seen in picture), again, the behaviour I'd expect after
application of solvents. The rest stay wrinkly, in a way I've seen in the past after hitting
stubborn decals once too often with solvents. Somehow, they've acquired built in solvents,
sometimes in overdose.
I don't think they ever did that back in the days. Very odd aging effect..
2017-03-04
All of the decals on both Buccaneers (and the Strikemaster) survived the rubdown with warm water.
2017-03-06
Somehow, I managed to cause a problem with a grubby canopy, despite my best efforts. The outside
is perfectly clear on both of them, but on the camouflaged plane, there was some white residue
under the tape, which was easily wiped off. Not so the similar residue on the inside. I can't
get to the inside anymore... I have some small hope that this residue is actually sanding
dust that got carried into an inconvenient spot and was deposited when the water used for
cleaning evaporated. If that is the case, I may be able to fix it by drilling a hole through
the forward wheel well, and getting a new load of soapy water inside through that, in hopes of
rincing the junk off and having it deposited in an out of sight location later. Not much to
lose, so unless a better idea comes up, I'll try it.
2017-03-06
Seems I've been pigging out on stupid pills; I managed to paint the inside of the gear doors of
the pink Buc pink, and the outsides grey. The other model is just as bad, with the wrong grey on
the wrong side of the doors..
Emergency repair mode engaged..
2017-03-06
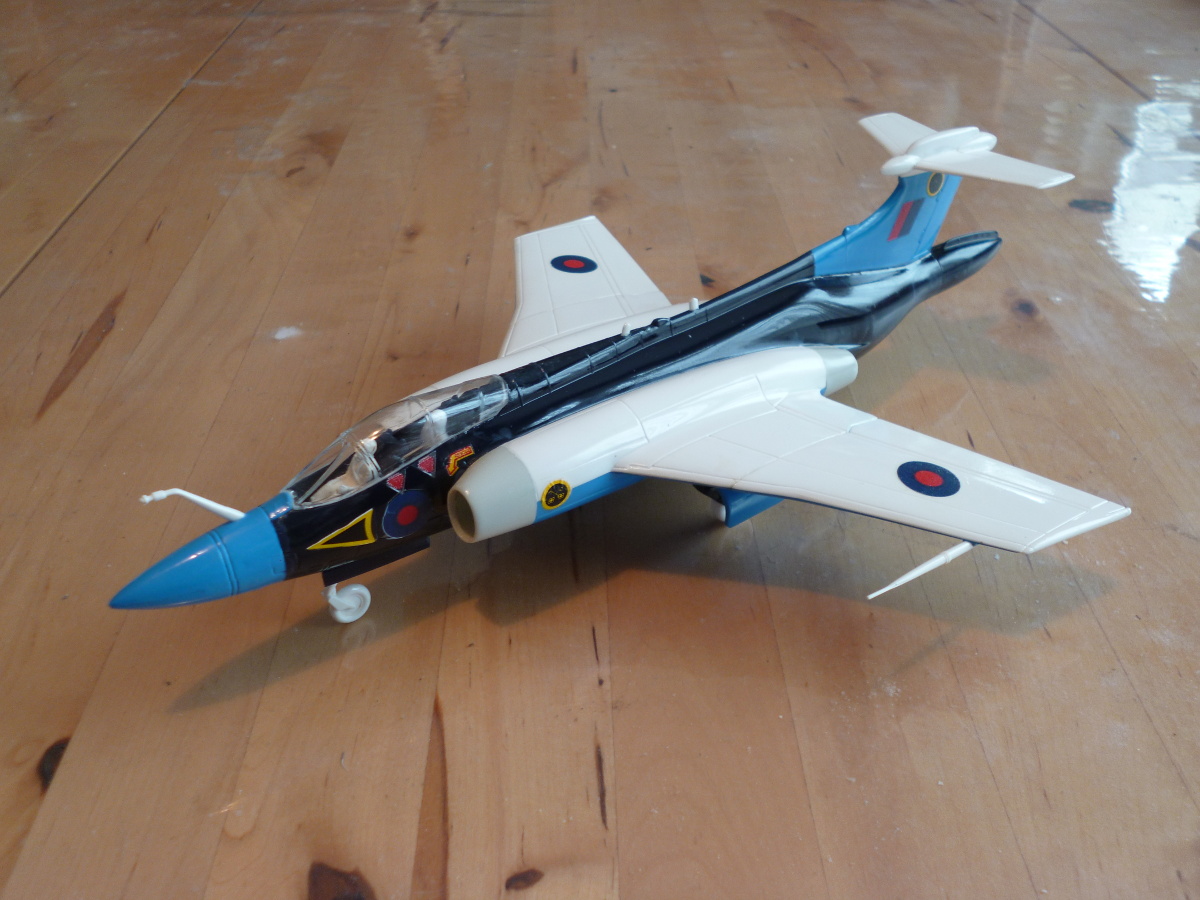
Despite my little confusion about the gear doors, the Buccaneers are complete. Aside from some
advanced cheating due to missing parts, both are completely OOB, including decals.
|
|
|
|
Finishing materials Matchbox:
Duplicolor Gloss topMotip primer overall (catasrophic, as predicted)
Humbrol 'Airbrush' 27
Hu166 Aircraft Grey underside
Hu164 Dark Sea Grey top
Hu163 Dark Green camo
Duplicolor Gloss overall
Microsol
Citadel Purity Seal overall
Finishing materials Revell:
Motip primer overallX32 Desert Pink overall
Microsol
Citadel Purity Seal overall