Hasegawa S-3A of VS-22
Contrary to my intentions, this page is written entirely after completion of the kit, so I might as well start with the summary: Bloody Vikings!.
I knew in advance that this kit was going to put up a fight, not
because there's something fundamentally wrong with it, but because
in this particular case, the kit is not exactly in mint condition.
It was bought second hand, and some parts had already been worked
on by a less than expert builder. Mostly, this took the shape of
odd bits and pieces with paint on them, but more seriously, the
canopy had been scratched badly, and the decal sheet had taken
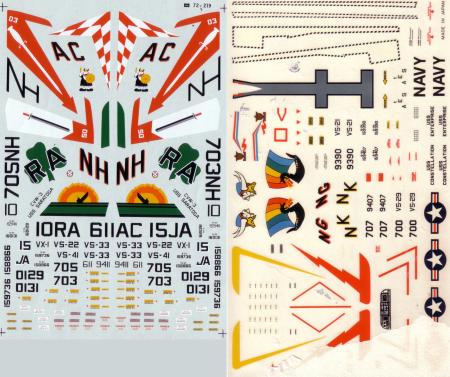
serious damage. I'm short on complete sets of Viking decals, so
even from the start the plan was to use the large walkways and
such from the kit's sheet, the squadron specific parts from
Microscale's sheet 72-219, and stencilling from Microscale 72-421.
Such a mix and match scenario can only cause trouble.
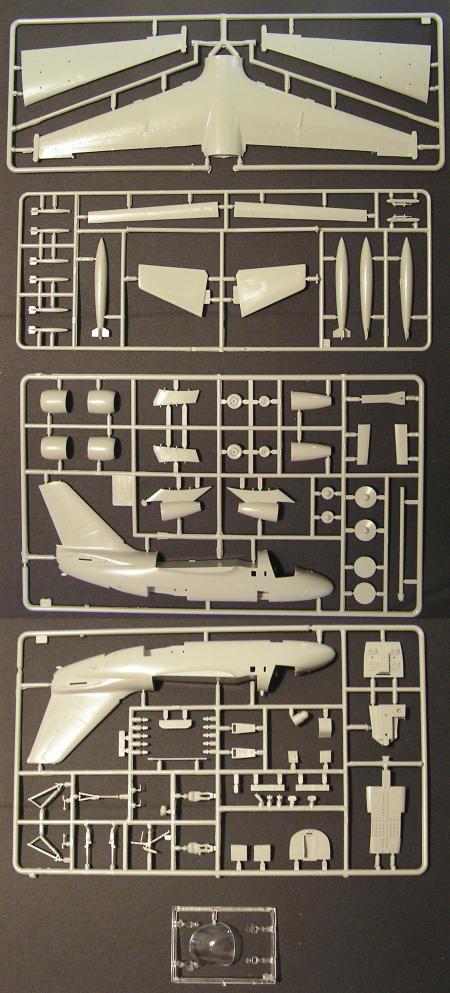
The pictures on the right show the sprues from another kit from
the stash, identical save for the fact that these are mint. The
damage to the decal sheet is also apparent.
Before starting on construction, I restored the canopy. This was surprisingly easy. Successively finer grades of sandpaper, then toothpaste and a piece of rubber, and finally a dip in Future. To my surprise, and delight, this resulted in a perfectly transparent, shiny canopy. Future is as good as its reputation.
Actual construction was pretty much shake and bake, so easy in fact that I hardly had to use any filler, which also meant next to no sanding, a good thing, given that the kit has raised panel lines. I managed to forget installing the control columns in the cockpit, continuing what is rapidly becoming a tradition of uncontrollable airframes, but I can hardly blame the kit for that. Full points to the folks at Hasegawa.
The fun started when I began to work on painting the now assembled
aircraft. Masking the canopy proved to be almost impossible. Even
where I hadn't had to sand out the scratches, the frames were so
lightly raised that they didn't show clearly through metal foil, so
I had to painstakingly pick them out with tape. At some point during
this process I realised this was never going to work properly, but I
saw no option but to finish it anyway. No sooner was the masking
than it hit me: I could design a set of decals to cover the frames
with, as is done on Academy's F-8E kits (thanks for the idea guys!).
Using a canopy from another stash denizen as a mould, I traced the
contours on masking tape, transferred the tape to a flat sheet of
paper, and fed the lot to the scanner. Once in the digital domain,
it was easy to clean up the imperfect traces, and print the
results. I also suspected that the panels over the ejection
hatches for the rear crewmembers would be problematic to mask, so
I included decals for those.
I wasn't all that convinced this was going to work, so I made the
mistake of leaving the masking tape on the canopy on the kit.
After airbrushing the radome, I put on the topside grey. I had been
warned by some folks that putting white over grey looked funny, but
I felt I had little choice in the matter given the pattern of the
paint job. Masking the white parts would have been a nightmare.
Mind you, masking the grey wasn't much better, the white panels on
the wings took about an hour of fiddling with teeny weeny bits of
tape each, but at least it was doable. Never again though, the next
time I do a high visibility scheme on a Viking, those panels will
be home made decals.
Once all the colours were on, I wanted to put on a high gloss varnish to give the decals a comfortable surface to sit on. So far I'd had good results with Revell's airbrush ready varnish, but on this occasion it came out as a cloud of sticky, thready web. Peter Parker might have been jealous, but I was annoyed as all hell. Last time I've tried to use that particuler gunk, believe you me. I was tired and frustrated, got rash, and shot a coat of no-name rattlecan varnish on, which, mercifully, worked just as advertised.
And then it was time for the decals. The much accursed, reviled
decals. Normally, I get along perfectly well with decals, but
all three commercial sheets turned on me with a vengeance. In
fact, the only ones that behaved properly were the ones I made
on my ALPS machine.
The damaged sheet of decals that came with the kit required at
least ten minutes of soaking before they could be persuaded to
move from the backing sheet. I believe myself to be a relatively
patient man when it comes to such things, but this is quite too
much. To their credit, once they were on
the move, they performed perfectly. The sheet I was using for
stencilling appeared to have the fantest of yellowing on the
sheet, but on the kit it was very noticable. The home brew
canopy frames worked as intended, but there is the slightest
grey rim visible peeping out from underneath them. At this
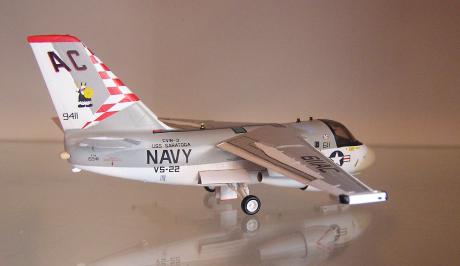
point, I changed my plans for the final markings of this kit
from the original VX-1, to the lower priority VS-22; I want
to keep the VX-1 markings for a kit with fewer flaws. The
squadron specific decals themselves also turned out to be
problematic, as the smaller ones tried to break up on me, or
fold into an inseparable mess if that wasn't possible. A coat
of liquid decal film fixed the breakup problem, but not before
I'd lost a critial one. I must admit to some disappointment
here; I'd expected better from Microscale. Fortunately, I could
rebuild the lost decal from bits and pieces from the sheet
that came with the kit.
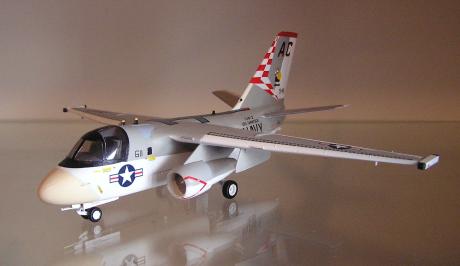
After all this entertainment, I was actually surprised when the final coat of varnish didn't cause trouble. The result can be seen below. It looks attractive enough at first glance, but on closer inspection it reveals rather more bumps and warts than I like.